How to Install the Upload Button in Picasa
You must have seen a lot of photos with watermark security and wonder why people add such a mark to their pictures?When you lot share your photos publicly or online, some quack people don't hesitate to apply other'due south works without giving any credit to original creators. They may even merits that the pictures vest to them.
This is when you understand the importance of ways to foreclose copying of photos. And the simplest of the ways is to add the watermark to photos.As a result, whether it is a painter, blogger or photographer, all of them are used to adding their initials, signatures or watermarks to their works. And they do and so to tell others that they are the actual creators of the images.Luckily, y'all can observe several online tools to watermark your photos before posting them online. 1 of the several tools is Picasa by Google. Though it is not photo editing software, information technology can add a watermark to photos yous export, add to Picasa web album or upload to Google photos.
So, stick to this guide and larn how you can add watermark to your photos in Picasa:
Office 1. Best Add Watermark Software-iMyFone MarkGo
iMyFone MarkGo has been used for nearly all the purposes related to editing, and then if you desire to add watermarks to your photograph/video, you can easily apply iMyFone MarkGo for better results. You don't accept to worry about how to employ it, as all the steps are mentioned down below.
iMyFone MarkGo Guide:
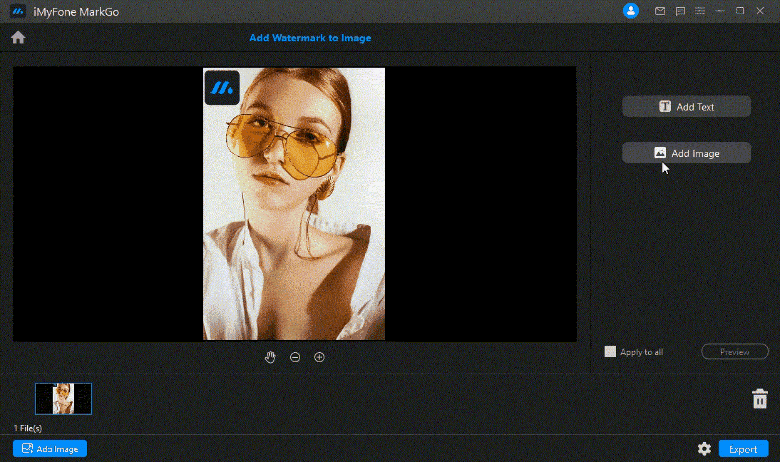
Step 1: Upload the prototype or video
Click the Upload button and pick the prototype or video yous plan to remove a watermark from.

Step 2: Utilise add text/add together image tool to add watermark surface area
click the add text/add epitome push button to add watermark area,then you can elevate the watermark area,you tin can also edit the text yous want.

Step 3: Click the preview button
At present you have added the watermark successfully! Await into the details of your images and do slight adjustment.
Pace 4: Export the video/image
After you lot already add the image/video watermark successfully,yous tin can export it now.

iMyFone MarkGo
Beginning to Remove Watermarks from Videos and Images Now.

Try It FreeTry Information technology Free
1,000,000+ people have downloaded it
Part 2. Create Watermark to Photos in Picasa Using Export Button
Picasa is an fantabulous photo storing, organizing, viewing, editing and sharing application. It is free and easy to apply. Subsequently installing it on your computer, it quickly scans all of your difficult drive photos, indexes them and makes them available for online sharing.Since Picasa can add watermark to photos, it is better to add watermark just before uploading to preserve photos copyrights. If you lot use Picasa, unlike other softwares, you lot don't demand to larn some technical noesis to add watermarks.
If you are interested in adding watermark to your photos while you export them to a selected folder, follow the given steps:
Footstep i :Launch Picasa and select the photos you would like to consign. Y'all tin choose a unmarried photograph or several photos at a fourth dimension. To select multiple photos, place all photos in a split folder and select them using Keys Ctrl+A. Another way is to select the first moving-picture show, move to the terminal picture, click information technology and then press the shift key to highlight all the pictures.Click the "Export push button" given at the bottom of the window to open an Export dialogue box.

Stride 2 : Now bank check mark the "Add watermark box" ,Blazon your watermark text in the text field given just below the watermark check box.Y'all tin also specify the image size or choose advisable prototype quality if you want to.You can also change the export location/directory path of the epitome file past clicking the "Browse push button" visible on the height right corner of the dialogue box.

In the stop, click the "Export button" to consign all of your pictures to the Export location
Function 3. Watermark Photos in Picasa with Customizable Text
If y'all desire to make a watermark equally per your preferred style and colour, y'all can practice then for a single moving-picture show at a fourth dimension. To add a customized watermark, follow the given steps:
Step 1 :Launch Picasa and from the library view, double click the picture you desire to edit. Double-clicking the picture will take y'all to the Edit View Mode

Footstep 2 :Select the "Text pick" from the left side toolbar. A contextual toolbar will be opened to edit the text

Footstep 3 :Change the font style by choosing the preferred font mode from a dropdown font listing.You can also modify the text size, text color, transparency and solid fill color,Now add text to the photo,Click anywhere on the text, and a wheel or clock will appear

Step 4 :Use this wheel to rotate the text, set up the text at an bending and position the watermark anywhere on the picture.Once done, click the "Utilize push".Now, go back to the library view and view your watermarked photo
Role 4. Add Watermark While Uploading Photos to Picasa Spider web Anthology or Google Photos
Acquire to add watermark while uploading photos through the following steps:
Footstep 1: Open Picasa on your figurer and select the images that yous would similar to upload

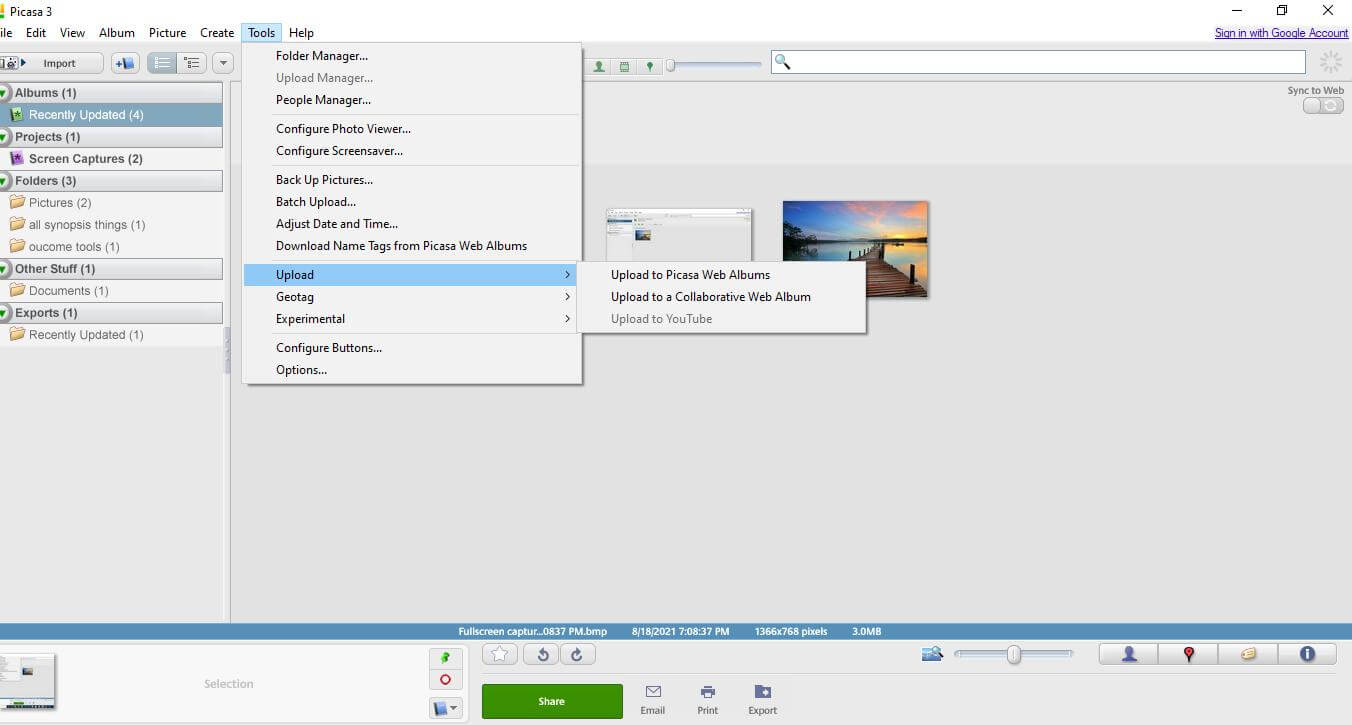
Step 2 :Click "Tools" and then cull "Options" that will open the Options window

Step 3 :From the options window, select "Web albums". If you take to upload photos to Google Photos, click the "Google photos tab",In both ways in the popular-up dialogue box, checkmark the watermark text box

Step 4 :Just below the checkmark box, add together your watermark text in the watermark text box. The watermark in the screenshot is My Art Gallery.Click Ok to exit the settings window. Your photos are now watermarked with the given text when you upload them.Click "Tools" again and select "Upload".If you desire to upload your watermarked photos to your Spider web album account, choose Spider web album,If you want to upload your photos on Google Photos, choose Google Photos.
Things to Know Nigh Creating Watermark for Photos on Picasa
When you use Picasa to add watermarks, always keep in mind that watermarks must consist of only texts and no images.Watermarks are applicable merely when the images are exported or uploaded and not on the original photos that you continue.If you want to bulk watermark at one time, it is also possible in Picasa.By default, Picasa adds the text watermark to the lower right corner of the photo and doesn't give the option to change the text's font, colour, or size.Text will always be white in the dark groundwork and blackness with dark background.
Conclusion
Y'all tin at present share your photos online without fear of someone else taking your pictures credit. You just have to add watermarks to your photos, and you are done preserving your photos copyrights. Use Picasa, an easy-to-utilize and freely available tool to add watermarks to your photos.It's a fact that we don't ever upload just photos. In fact, most of the time, we endeavour to upload exciting and eye-catching videos to grab our audience'south attention. Too, customers prefer watching a video related to any product or service before making a last purchase.
Withal, if you also want to share your stories in videos, then iMyFone MarkGo is the best watermark remover. Because of its piece of cake to use engineering science and quickest results, information technology is becoming users' peak choice. Then, purchase it now and commencement add together watermark or remove watermark.
iMyFone MarkGo
Starting time to Remove Watermarks from Videos and Images Now.
Endeavour Information technology FreeTry Information technology Free
1,000,000+ people have downloaded it
svendsenthatheriams1995.blogspot.com
Source: https://filme.imyfone.com/watermark/add-watermarks-to-photos-in-picasa/
Post a Comment for "How to Install the Upload Button in Picasa"